Loc Tools and Techniques
Tools
One of the beautiful things about locs is that it doesn’t require many “tools”. As a matter of fact, depending on the style of locs you choose, it doesn’t require anything.
The popular “tool” used for locs is the latch hook. This tool is used by people who tighten their locs using an interlocking method.
There are other types of handmade “tools” that are used to work like a latch hook to pull your hair through itself: hairpins, plastic bead stringers, etc.
Hairclips and elastic bands are used to keep hair sectioned and out of the way while working on other sections of hair.
Techniques
-Twists
--Single Twists: After washing and towel drying, separate a section of hair to twist. The size of the section depends on how thick you want your locks to be. Using a product to twist your hair, such as pure aloe vera gel, or a lock and twist butter, apply product down the length of your hair, and use your finger to twist/twirl your hair into a coil. Single twists are used to start the locking process, or to retighten the new growth of hair at the root.
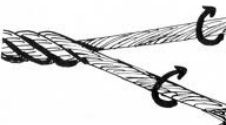
--Two-Strand Twists: Follow single twist instructions except you take two portions of hair and twist them around one another. So, in the section of hair you have now divided that section into two strands of hair. Simply wrap the two strands around each other. Two-Strand Twists are used to start the locking process. Twist the hair and let it stay twisted. It will eventually lock.

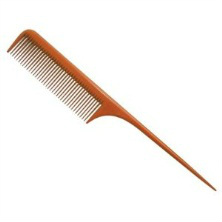
"Rat Tail" Comb
--Comb Twists: This method is used to start the locking process. It is helpful when starting twists on very short hair. After washing and towel drying, separate a section of hair to twist. The size of the section depends on how thick you want your locks to be. Using a product to twist your hair, such as pure aloe vera gel, or a lock and twist butter, apply product down the length of your hair. For this method, you will use a comb, such as a rat tail comb to do the twisting. Place the comb in the section of hair that you have separated. Using the comb to twist the hair, twist while slowly pulling the comb away from the hair (you don’t want the comb to get tangled into the hair, so pull away as you twist). Your hair will be twisted into coils.
--Two Hand Twists: This method is for retightening your new growth. Once again, apply whatever loc product you use. This time you will be working with two locs at a time. Find two locs next to each other and single twist/twirl them both at the same time around your fingers (one on the right hand, and one on the left). Now, since you are using both your right and left hand at the same time, you will be twisting both clockwise, and counterclockwise. This is fine. It is not necessary to twist every loc in the same direction, because you are only twisting the new growth. Remember, the rest of your hair is already locked!
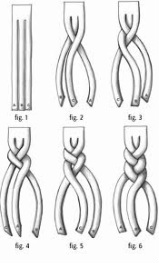
-Braid Locs: After washing and towel drying, separate a section of hair to braid. As in the twists, the size of the section depends on how thick you want your locks to be. Separate the section into three strands of hair. Braid the hair by alternating the strands over each other (left strand over the middle, right strand over the left strands new position to the middle, etc). Braids are used to start the locking process. This method helps to keep your hair separated during the locking process even through hair washing. Braid the hair and let it stay braided, it will eventually lock.
-Braid Locs: After washing and towel drying, separate a section of hair to braid. As in the twists, the size of the section depends on how thick you want your locks to be. Separate the section into three strands of hair. Braid the hair by alternating the strands over each other (left strand over the middle, right strand over the left strands new position to the middle, etc). Braids are used to start the locking process. This method helps to keep your hair separated during the locking process even through hair washing. Braid the hair and let it stay braided, it will eventually lock.
-Genie Locs (or Yarn Locs): These are locs made combining yard with natural hair. The yarn can be added to the natural hair by wrapping, twisting, or braiding it in.
-Palm Rolling: This method is used to retighten your locs. Simply apply your product to your hair, then place your loc in the palm of your hand. Twist by rolling the loc in the palms of both hands. Roll your loc in one direction. You may need to roll a few times per loc depending on how much new growth you have at the roots.
-Interlocking: This method is used both for starting locs, and for retightening them. This method also uses a tool many times (see tool section).
To retighten – using a latch hook, or other tool, insert tool into the loose, root
area of your hair, place your loc inside the tool, pull the tool containing the loc back through the hair. Do this again coming from a different direction to keep from having spaces in your hair. The pattern many use is to think of the numbers on a clock: 12 o’clock, 3 o’clock, 6 o’clock, and 9 o’clock. Or, you can think of directions: North, South, East, and West. So, when inserting the tool in your hair, you will alternate coming from 3 o’clock towards 9 o'clock, 6 o’clock towards 12 o'clock, 9 o'clock towards 3 o'clock, then 12 o’clock down towards 6 o’clock, etc. You want to end up taking your hair down (12 to 6 o'clock) so it will lay down rather than stick up. You keep alternating directions for a tight look.
You can also just use your fingers to interlock rather than using a tool. You'd use your fingers to "open" a section of your hair while using your other hand to knot or insert the loc into the opening.
If you use this method, please do not over tighten and place excess stress on the roots of your hair.
-Loc Extensions: There are different methods for adding extensions to your own hair. You can section the hair, braid it, or braid in some synthetic hair into the natural hair. Then, you take some synthetic hair (the size depends on how thick your locs are). Start wrapping the synthetic hair around the braid, beginning at the root/scalp area and working your way down the length of the hair. You will not twist, but you will wrap the synthetic hair around the hair on the head. (Twisting involves alternate overlays of hair over each other. Wrapping is keeping the attached hair in place while wrapping the added hair around the in place hair.) As you run out of added, synthetic hair (depending on how long you are making your extensions), pick up another piece of synthetic hair and continue wrapping where you left off. Do this all the way down to the end of your locs. When you get to the very end of the loc, change wrap direction with those few strands of hair and wrap those “leftover” synthetic hairs UP the loc to finish off.
-Silky Locs: Once again, there are different ways of achieving this. Basically speaking, you can attach synthetic locs using the instructions in Loc Extensions using straight hair (they are now described as silky locs). Or, you can use kinky hair added and then use a blow dryer down the length of the added loc to straighten the added hair making it silky.


